• Skip to main content

Hippo Adviser

Can I Add Flip Screen To My Camera? Top 5 Choicesan

January 4, 2023 by admin

Adding Flip Screen To My Camera

Digital cameras are becoming more and more popular, but there are still many people who prefer the old-fashioned way of taking pictures. One thing that digital cameras have that old-fashioned cameras don’t is the ability to add a flip screen.

This can be a great way to take pictures of yourself in difficult positions.

Can I Add Flip Screen To My Camera? You can usually find accessories for popular camera models online or at your local camera store. Adding a flip screen to your camera can be a great way to improve its functionality, but it’s not possible for every model.

You are a photographer who wants to make videos. Making videos is complicated, expensive, and time-consuming.

The Flip Screen add-on for your camera makes creating videos easy and fun!

What is a flip screen?

A flip screen is a type of camera that can be flipped from the camera’s body. This allows you to take pictures at different angles and also makes it easier to see the LCD screen when you’re taking a picture.

Our Savings For Flip Screen Cameras [Todays Deal]

Flip screens are available on many different types of cameras, including point-and-shoot cameras, DSLRs, and even some action cameras.

Can I Add Flip Screen To My Camera?

If you’re looking for a way to add a little more creativity to your photography, you may be wondering if you can add a flip screen to your camera. The good news is that there are a few different ways to do this, and it’s not as difficult as you might think.

Here’s a look at how you can add a flip screen to your camera.

One of the easiest ways to add a flip screen to your camera is to purchase an aftermarket LCD screen that fits onto the back of your camera. These screens typically come with all the necessary mounting hardware and instructions, so they’re easy to install.

Once you have the screen in place, you’ll be able to see what you’re shooting without holding the camera up to your eye. This can be great for taking low-angle shots or getting yourself into the frame when taking group photos.

6 benefits of Using flip screen with Cameras

A flip screen can offer several benefits over a traditional computer monitor. For one, a flip screen can be more easily transported and set up than a bulky monitor. There are a few benefits to having a flip screen on your camera.

1. Increased creativity

Adding a flip screen to the best Flip Screen cameras can help increase creativity. This is because it allows the photographer to see the composition of the shot before taking it and making any necessary adjustments. It also means that the photographer can take self-portraits or shots from unusual angles without guessing the final result.

Overall, having a flip screen can help encourage creativity, as it gives the photographer more control over the final image. This extra level of control can lead to better results and more satisfied customers.

2. More engaging videos

Are you worrying about ways to make your videos more engaging?

If so, there are a few things you can do to add some pizzazz to your productions.

First, consider adding a flip screen to your camera. This will allow you to see yourself as you’re filming, which can help ensure you’re in the frame, and your expressions are on point.

Another way to make your videos more engaging is to add graphics or animations. This can help add interest and break up the monotony of a talking head video. Just be sure not to overdo it – a few simple graphics or animations can go a long way.

Finally, don’t underestimate the power of a good story. A well-told story will captivate viewers and keep them coming back for more.

3. More stable footage

A flip screen can be a handy addition to a camera, particularly if you want to create more stable footage. When shooting video, it is often difficult to keep the camera still while also framing the shot correctly. A flip screen lets you see what you are shooting while keeping the camera more stable.

One is that you can’t always see your photos’ results immediately. Another is that they can be more challenging to carry around than traditional cameras.

Check out our guide below if you are considering adding a flip screen to your camera.

4. Improved audio quality

It’s no secret that audio quality is one of the most important aspects of a good camera. Thankfully, with recent advancements in technology, it’s now easier than ever to get excellent audio quality from your camera.

Here are a few ways that you can improve the audio quality of your recordings:

Use an external microphone: an external microphone will allow you to capture high-quality sound without background noise.

Use a windscreen: if you’re recording outdoors, using a windscreen can help reduce any unwanted wind noise.

Adjust the audio settings on your camera: depending on your camera model, there may be various audio settings that you can adjust to improve the sound quality of your recordings further.

5. Greater control over composition

A flip-screen camera may be an excellent option if you want greater control over their composition. With a flip-screen camera, you’ll see precisely what the image will look like before you take the photo.

This can help ensure that your composition is the way you want it.

In addition, a flip screen can be helpful when taking photos in low light conditions or when trying to capture a moving subject.

6. Increased portability

The increased portability of digital cameras has made them a popular choice for travelers. The ability to take pictures and videos on the go has made them a must-have for many people.

You can also use the flip screen to help compose group shots. By seeing the frame on the screen, you can direct people into position and get everyone looking their best before taking the photo.

Overall, the increased portability of digital cameras is a significant advantage.

Cost of adding a flip screen to a camera

Adding a flip screen to a camera can be a costly endeavor. Not only do you have to purchase the screen itself, but you also have to pay for the labor to install it. The cost of the screen itself can range from $50 to $200, depending on the brand and model of your camera.

The labor cost will depend on the camera shop you take it to, but it is typically around $100. Therefore, adding a flip screen to your camera can range from $150 to $300.

How to add a flip screen to a camera?

Adding a flip screen to a camera is a popular modification many photographers make. This tutorial will show you how to add a flip screen to your camera.

There are several ways to add a flip screen to your camera. The most common way is to purchase an aftermarket LCD screen that replaces the existing one on the back of the camera. These LCD screens typically have hinges that allow them to be flipped from the camera’s body.

Another way to add a flip screen to your camera is to use an external monitor. This involves attaching an HDMI cable from the HDMI port on the side of the camera to an external monitor.

The advantage of using an external monitor is that you can position it anywhere you like, and it doesn’t require any modification to your camera.

One of the most popular features of modern cameras is the flip screen. This allows you to see yourself as you take pictures or videos, which is great for selfie mode or vlogging.

Top 5 Cameras with Flip Screen [Budget Friendly]

Maybe you want to see yourself as you’re taking pictures, or you want to take pictures from different angles without contorting your body. Either way, plenty of great cameras with flip screens can help you get the perfect shot.

Here are five of the best cameras with flip screens that money can buy:

1. Sony ZV-1 VLOGGING CAMERA
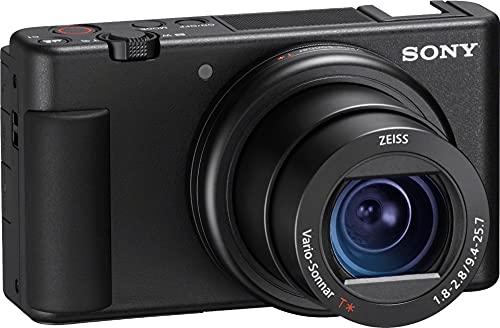
Overview: The Sony ZV-1 is one of the best Sony vlogging cameras and is an excellent option for those looking for a device with a flip screen.

Sony ZV 1 VLOGGING CAMERA

This camera has many features that make it ideal for vloggers, including a fast autofocus system, a built-in microphone, and 4K video recording.

The flip screen makes it easy to frame yourself in the shot, and the compact design means you can take this camera anywhere.

The autofocus is fast and accurate, and the image stabilization is excellent. The only downside is the price; at $799, it’s one of the most expensive vlogging cameras on the market.

But if you can afford it, the Sony ZV-1 is an excellent choice for anyone looking for a high-quality vlogging camera.

2. Canon PowerShot G7 X Mark III

The Canon PowerShot G7 X Mark III is a high-end point-and-shoot camera released in 2018. It features a 20.1-megapixel sensor, 4K video recording, and a flip-out LCD screen.

Canon PowerShot G7 X Mark III

The camera is also equipped with Wi-Fi and Bluetooth connectivity, so you can quickly transfer files to your computer or smartphone.

If you’re looking for a point-and-shoot camera with all the bells and whistles, the Canon PowerShot G7 X Mark III is a great option. It’s incredibly well suited for vloggers and travelers, thanks to its compact size and flip-out LCD screen.

The only downside is that it doesn’t have an interchangeable lens system, so you’ll be limited to the fixed 24-105mm f/4 lens.

3. Sony Alpha A6600 Mirrorless Camera

The Sony A6600 is one of the most popular cameras on the market. It is known for its high-quality images and great features.

Sony Alpha A6600

It would appear that adding a flip screen to a camera is possible, as Sony has done with the A6600. This might be a good option for those who want to vlog or take self-portraits with their camera.

The A6600 also has features that make it suitable for shooting videos, like 4K resolution and stabilization.

4. NIKON Z50 COMPACT MIRRORLESS CAMERA

The Nikon Z50 is an excellent choice for a compact mirrorless camera. It’s small and lightweight, making it easy to carry around, and it has a flip screen that makes it easy to take pictures and videos.

NIKON Z50 COMPACT MIRRORLESS CAMERA

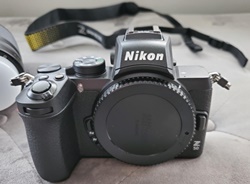
The camera also has many features, including Wi-Fi and Bluetooth, that make it an excellent choice for a beginner or an experienced photographer.

The Nikon Z50 is a great little camera. It’s small and light, yet still packs a punch with its features and performance.

The image quality is excellent, and the autofocus is fast and accurate. But overall, the Nikon Z50 is an excellent choice for a compact mirrorless camera.

5. Panasonic Lumix ZS70 (TZ90)

The Panasonic Lumix ZS70 (TZ90) is a point-and-shoot camera with a flip screen. This allows you to see yourself while taking the picture, which is perfect for selfie lovers.

Panasonic Lumix ZS70 TZ90

The Panasonic Lumix ZS70 is a versatile and powerful point-and-shoot camera. Its features include a 30x optical zoom lens, 4K video recording, and built-in Wi-Fi.

The camera is easy to use, even for beginners. The Panasonic Lumix ZS70 is an excellent choice for an affordable, feature-packed point-and-shoot camera.

Frequently Asked Questions (FAQs)

Can you attach a flip screen to a camera?

Yes, you can attach a flip screen to a camera! Flip screens are used in digital cameras to provide users with real time feedback on the images they capture. They allow photographers to accurately frame their shots and review images immediately after taking them.

Flip screens are also known as tilting screens, because of the way they can be adjusted for various angles when photographing tricky subjects. This makes them perfect for shooting from unique perspectives or capturing high-angle shots.

They’re especially useful for photographers who don’t have access to sophisticated tripods or rigs. With a flip screen attached to your camera, you’ll be able to quickly adjust its position and angle without having to move around too much.

With the help of a flip screen, verifying composition and quality is made easier than ever before.

How do I flip my camera screen?

Flipping the camera screen is a popular feature that allows users to capture photos and videos from different angles. Whether you’re an amateur photographer or a professional, knowing how to flip your camera screen can be a useful tool for taking stunning images.

If you own a Canon EOS digital camera with a touch screen, flipping the camera screen is relatively simple.

First, press the “Menu” button on your Canon EOS digital camera. Then search through the “Settings” menu until you find an icon that looks like two arrows pointing in opposite directions – select this icon and it will take you to the “Screen Flip” option where you can toggle between horizontal and vertical views.

Once you have chosen your desired view, press the OK button, and your camera’s display should immediately flip accordingly.

Do DSLR cameras have flip screen?

The answer is largely yes, many DSLR cameras do have a flip screen. This feature allows the user to see their images in real-time and immediately adjust their settings if needed. Live view technology has become an important component of digital photography and its use has grown over the past decade.

With a flip screen, photographers can easily take shots from different angles with just the LCD display instead of having to look through the viewfinder.

The use of flip screens also help improve image quality. In live view mode, photographers can zoom into specific areas of the scene before taking a shot to ensure that all details are in focus and properly exposed.

How do I flip my screen like a mirror?

Flipping your computer screen is an easy, yet effective way to get a realistic view of how you look from the front. From taking selfies for social media or checking yourself out before heading out, there are plenty of reasons why you might want to mirror your computer display.

You can even use the feature as a light capability tool that allows you to adjust lighting and angles when shooting video. This article will provide step-by-step instructions on how to flip your screen like a mirror quickly and easily.

Understanding body image is something we all struggle with at times, making it important to be able to see ourselves without distortion or bias. Mirroring your display can be helpful in this regard by allowing you to objectively assess things like proportions and shadows.

Conclusion

In conclusion, you can add a flip screen to a camera. It is a great way to improve the functionality of your camera, and it can be a fun addition to your photography toolkit. Just be sure to do your research before buying, and ensure that the flip screen is compatible with your camera model.

Relevant Buying Guide:

  • 10 Best Vlogging Camera that YouTubers Use In 2023 [A REVIEW]
  • Yada Digital Wireless Backup Camera Review [With Installation Guide]
  • Best Night Vision Security Camera For Home Top 15 [2023 REVIEWs]

Filed Under: Blog, Tech

Is Drawing Tablet Better Than Paper? [A Complete Guide]

January 4, 2023 by admin

A drawing tablet is a computer device that lets a user hand-draw images, graphics, and text directly onto the screen or via a connected monitor. Drawing tablets are used by graphic designers, illustrators, animators, and architects.

The main benefit of using a drawing tablet is that it offers a more natural way to create digital art than a mouse or trackpad.

You are an artist and want to draw digitally, but you don’t know whether it’s better to use a drawing tablet or paper. Drawing tablets are expensive and come with a steep learning curve.

In today’s article, Hippo Adviser team will tell you everything you need to know about drawing tablets to decide what is best for your needs!

Our Savings For Best Drawing Tablets [DEALs]

With paper, once you make a mistake, it’s there forever. With a drawing tablet, you can hit the undo button and fix it. This can save time and frustration, especially when working on complex illustrations.

What Is A Drawing Tablet?

A drawing tablet is a computer device that allows you to draw on a screen with a stylus or the best pen. These devices come in various sizes and prices, from small and affordable to extensive and expensive. Many artists prefer drawing tablets because they offer more control and flexibility than traditional drawing paper.

Is Drawing Tablet Better Than Paper?

In the past, many artists and illustrators used paper as their primary medium. However, with the invention of drawing tablets, more and more artists are switching to digital. While some holdouts still prefer good old-fashioned paper and pencils, drawing tablets offer several advantages that make them a better choice for many artists.

Paper vs. Drawing Tablets: Which is better?

Nowadays, there are two popular methods for artists to create their work – with paper or with a digital drawing tablet. So which is better? It depends on the artist and what they want in their work.

Drawing Tablet Offers Several Advantages Over Paper

A best drawing tablet for beginners offers several advantages over paper. You can quickly fix mistakes with the click of a button and save your work electronically, so you never have to worry about losing it. Plus, carrying a digital drawing tablet around is much easier than lugging a stack of papers!

Paper Has Been The Traditional Choice For Artists

Paper has been the traditional choice for artists for centuries. It’s easy to find and relatively inexpensive. Plus, a wide variety of paper types are available, from sketchbooks to watercolor paper.

However, paper can be challenging to transport, and it’s not always possible to get a clean erasure if you make a mistake.

Drawing Tablets Are Lightweight And Portable

Drawing tablets have become increasingly popular in recent years as technology has advanced. They offer many advantages over traditional paper, such as being lightweight and portable. You can also save your work electronically, which makes it easy to share with others or make copies. And if you make a mistake, you can hit the undo button.

At the end of the comparison between paper and Drawing tablet, conclude that the drawing Tablet is the best option for drawing due to its lightweight, undo and redo options.

Buying Advice: 5 Reasons Why You Have A Drawing Tablet?

A drawing tablet is a device that allows you to draw or paint on a computer. It consists of a flat surface on which you can rest your hand or arm and a stylus, a pen-like tool you use to draw.

There are many benefits of using a drawing tablet.

1. Increased Accuracy

There are several reasons why drawing on a tablet can be more accurate than traditional methods like pencil and paper. For one, the tablet’s surface is often more smooth than paper, providing a more consistent line.

In addition, many tablets come equipped with pressure-sensitive features that allow for greater control over line thickness and other details. This can be particularly helpful when trying to achieve fine details or shading.

Finally, a stylus can also help with accuracy as the android tablet provides a more natural and comfortable grip than a pencil. This can allow for greater precision when making lines and strokes.

2. Increased Speed

There’s no doubt that digital art has increased in popularity, with many artists finding that drawing tablets offer several advantages over paper. One of the most significant advantages is its speed. You can create artwork much faster with a drawing tablet than with a pencil and paper.

This is because you don’t have to stop and start to sharpen your pencil or apply more ink to your pen. You can keep going, producing much more art in a shorter time. This is excellent news if you’re trying to build a portfolio or create commission pieces for clients.

Of course, there are some drawbacks to working at such high speeds. It can be easy to make mistakes, and it’s harder to go back and make changes once you’ve committed something to the digital canvas.

3. Increased Precision

As technology has developed, so too has the accuracy of drawing tablets. Increased precision means that artists can now create more detailed and realistic artwork. This is especially beneficial for those who work in architecture or product design, where even the slightest mistake can have significant consequences.

It’s not just the hardware that has become more precise, but the software too. Newer drawing tablets come with pressure-sensitive pens that can mimic the feeling of using a real pencil or brush. This makes them ideal for traditional artists who want to transition to digital art without compromising quality.

Overall, increased precision is a huge benefit for artists of all types. Whether a professional looking for greater accuracy or a beginner just starting, a drawing tablet can help you create better artwork.

4. More Intuitive Controls

There are many benefits to using a drawing tablet over the paper. One of the most important benefits is that drawing tablets have much more intuitive controls. With a drawing tablet, you can easily change your brush’s size, shape, and color with just a few clicks.

You can also create multiple layers to separate different elements of your drawing. This makes it easy to make changes and experiment with different ideas without having to start from scratch every time.

5. More Natural Feel

There are many reasons why people might prefer a drawing tablet over paper. One reason is that it can provide a more natural feel. When you use a drawing tablet, you can rest your hand on the tablet while you draw, which can be more comfortable than holding a pencil or pen.

Additionally, the pressure-sensitive surface of the tablet can give you more control over the line thickness and darkness than a pencil or pen.

Finally, drawing tablets offer a wide range of features and functions that paper cannot match.

What To Consider Before Buying The Drawing Tablets?

If you’re considering buying a drawing tablet, you should keep a few things in mind.

features

First, consider what you’ll be using the tablet for. If you’re a professional artist who wants to create digital paintings or illustrations, you’ll need a higher-end model with features like pressure sensitivity and programmable buttons.

On the other hand, a more basic tablet will suffice if you’re looking to doodle or jot down notes.

compatibility

Another thing to keep in mind is compatibility. Make sure the tablet you choose works with the type of computer you have.

Some tablets only work with certain types of software, so if you have your heart set on using a specific program, check that it’s compatible with your tablet before making your purchase.

price

Finally, think about the price of the tablet you can afford instead of drawing on paper. If you want to use your tablet for artwork, you’ll likely need a more advanced model with extra features.

On the other hand, a more basic tablet will suffice if you’re looking to doodle or jot down notes.

8 Best Drawing Tablets For Drawing 2023 [A Review]

A drawing tablet is a computer input device that lets users hand-draw images, animations, and graphics on a pressure-sensitive pad with a special pen-like stylus. The line drawings can then be transferred to a computer or saved as digital files.

Many brands and models of drawing tablets are available on the market, but which is the best for you?

Here is a list of the eight best drawing tablets based on customer reviews:

1. Amazon Fire HD 10 Kids Pro Tablet [Our Choice]

The Amazon Fire HD 10 Kids Pro Tablet is perfect for kids. It has all the features that kids need, including a kid-proof case and access to over 20,000 apps and games. Plus, it comes with a 2-year worry-free guarantee.

Amazon Fire HD 10 Kids Pro Tablet

So if your kids are looking for a new tablet, the Amazon Fire HD 10 Kids Pro Tablet is the perfect option.

The Amazon Fire HD 10 Kids Pro tablet is an excellent option for kids who want a durable, kid-friendly tablet. The tablet has a 7″ HD display, 8 GB of internal storage, and a 2 MP rear-facing camera. The tablet runs on Fire OS 5.3 and comes with a 1-year subscription to Fire for Kids Unlimited.

The tablet is very well-built and feels sturdy in hand. The display is bright and clear, and the speakers are loud and clear. The camera takes decent photos but isn’t anything special.

One of the best features of the tablet is the 1-year subscription to Fire for Kids Unlimited. This gives your kids access to thousands of kid-friendly books, movies, TV shows, apps, and games.

2. Wacom Cintiq 16 Drawing Tablet [Best Budget]

The Wacom Cintiq 16 Drawing Tablet is one of the best ways to get into digital art. It’s a great way to improve your skills and an excellent tablet for beginners.

Wacom Cintiq 16 Drawing Tablet

The Cintiq 16 features a high-resolution display, a pressure-sensitive pen, and 8,192 levels of pressure sensitivity. It also has a large working area, making it perfect for detailed drawings and paintings.

Wacom’s Cintiq 16 drawing tablet is a powerful tool for any artist. Its large screen and pressure-sensitive pen make it perfect for detailed work. The tablet is highly portable and lightweight, making it simple to carry anywhere.

The Cintiq 16 is easy to set up and use, and the included software is top-notch. Overall, it’s an excellent tablet for anyone who wants to get serious about digital art.

3. Xencelabs Drawing Tablet [Excellent Choice]

Xencelabs Drawing Tablet is one of the most popular tablets on the market. Artists and hobbyists love it for its large screen and sleek design. The tablet has a pressure-sensitive pen that makes drawing and painting a breeze.

Xencelabs Drawing Tablet

The Xencelabs Drawing Tablet also has various features that make it an excellent choice for beginners and professionals.

If you’re looking for a high-quality drawing tablet on a budget, the Xencelabs Drawing Tablet is a great option. It’s compatible with Mac and PC and offers all the features you need for digital art, including pressure sensitivity and programmable buttons.

The tablet is large enough for comfortable drawing, and the included pen is ergonomic and feels good.

Pressure sensitivity works well, and there’s very little lag when drawing. The Xencelabs Drawing Tablet is an excellent budget alternative to more expensive Wacom tablets.

4. Apple iPad Air 5th Generation [Excellent Performance]

The Apple iPad Air 5th Generation is an excellent choice for a powerful and lightweight tablet. It has a beautiful display and excellent performance.

Apple iPad Air 5th Generation

The iPad Air is available in two different sizes, the 10.5-inch, and the 12.9-inch. The 10.5-inch is the more popular of the two, and it’s the one we recommend. It has a 2224 x 1668 pixels resolution and uses an IPS panel.

The 12.9-inch model has a higher resolution, 2732 x 2048 pixels, but it’s not as bright as the 10.5-inch model. It also uses an OLED panel which can lead to image retention issues if you’re not careful when using it.

5. Wacom Intuos Pro Paper Edition [Lightweight]

Wacom Intuos Pro Paper Edition is a great way to digitize your artwork. The tablet has a large drawing area and a pressure-sensitive pen, making it easy to create precise lines and strokes.

Wacom Intuos Pro Paper Edition

The Paper Edition also includes a detachable paper clip, which allows you to attach your favorite drawing paper to the tablet for a natural feel.

The Wacom Intuos Pro Paper Edition is an excellent choice for artists who want to digitize their work. The tablet has a large drawing area and a pressure-sensitive pen, making it easy to create precise lines and strokes.

The Paper Edition also includes a detachable paper clip, which allows you to attach your favorite drawing paper to the tablet for a natural feel.

If you’re looking for a high-quality digital drawing experience, the Wacom Intuos Pro Paper Edition is worth considering.

6. Cintiq 16 Drawing Tablet [Also Great]

The Cintiq 16 drawing tablet is a must-have tool for any serious artist or graphic designer. This innovative device lets you draw directly on the screen, providing a natural and intuitive way to create digital art.

Cintiq 16 Drawing Tablet

The Cintiq 16 also offers a variety of helpful features, such as pressure-sensitive pen input, multi-touch support, and on-screen controls.

With its large display and high resolution, the Cintiq 16 is perfect for detailed work. If you’re looking for a top-of-the-line drawing tablet, the Cintiq 16 is the ideal choice.

The Cintiq 16 is one of the newest drawing tablets on the market, and it’s packed with features that make it an excellent choice for any artist. The tablet has a large screen that makes it easy to see your work, and the pressure-sensitive pen gives you plenty of control over your lines.

The tablet also has various software programs that make it easy to start with digital art.

Overall, the Cintiq 16 is an excellent choice for anyone who wants to get into digital art or improve their skills.

7. Artist12 Pro Graphics Drawing Tablet [Editor Choice]

As an artist, you know that having the right tools can make all the difference in your work. The Artist12 Pro Graphics Drawing Tablet is a high-quality tablet that gives you the precision and control you need to create your art.

Artist12 Pro Graphics Drawing Tablet

With its large 12″ x 8″ drawing area, a pressure-sensitive pen, and included software, the Artist12 Pro is an excellent choice for any artist looking for a professional-grade tablet.

Whether you’re a seasoned veteran or just starting, the Artist12 Pro Graphics Drawing Tablet is an excellent choice for anyone looking for a quality drawing tablet.

It’s large 12″ x 8″ drawing area gives you plenty of space to work, and its pressure-sensitive pen provides the accuracy and control you need to create your masterpiece. Plus, the included software makes it easy to get started right away.

8. XP-PEN Artist Pro [Runner Up]

XP-PEN Artist 15.6 Pro is one of the latest additions to the company’s line of graphics tablets. It features a large drawing area, 8192 pressure sensitivity levels, and Windows and macOS support. The tablet has a battery-free stylus, various shortcut keys, and a carrying case.

XP PEN Artist Pro

The XP-PEN Artist 15.6 Pro is an excellent choice for artists and designers looking for a high-quality graphics tablet. It offers a large drawing area, 8192 pressure sensitivity levels, and Windows and macOS support. The tablet has a battery-free stylus, various shortcut keys, and a carrying case.

The XP-PEN Artist 15.6 Pro is one of the most popular drawing tablets on the market. Artists love it for its large drawing area and high pen pressure sensitivity. In this review, we’ll take a closer look at the features that make this tablet so popular and see if it lives up to the hype.

The first thing you’ll notice about the XP-PEN Artist 15.6 Pro is its large drawing area. This gives you plenty of space to work on your art, and you don’t have to keep moving your hand around as much.

The tablet also has good pen pressure sensitivity, which makes it easy to get the right amount of pressure on your strokes.

Conclusion

In conclusion, drawing tablets offer several advantages over traditional paper and pen. They’re less expensive, more portable, and easier to store.

Plus, you can use them for various purposes, including taking notes, sketching, and editing photos.

A drawing tablet may be the perfect solution if you’re looking for a new way to capture your ideas.

Relevant Buying Guides:

  • 20 The Best Canon Cameras With Flip Screen Review
  • 10 Best Monitors For CAD Review [The Top 10]

Filed Under: Blog, Guides, Tech

How To Install A PC Case Fan? [Quick-Start]

January 3, 2023 by admin

Installing A PC Case Fan

PC case fans are an important part of any gaming rig. They help keep your components cool, and can even improve your system’s performance. Here’s a quick guide on How to Install a PC Case Fan?

You are not sure how to install a PC Case Fan. Installing a PC Case Fan is tricky, and you don’t want to damage your computer or other components.

Follow Hippo Adviser’s step-by-step guide on how to install a PC Case Fan!

Our Savings For PC Case Fans 2023 [DEALs]

In this article, we will show you how to install a PC case fan. This is a relatively simple process that anyone can do. You will need to gather a few tools before you begin. Once you have everything, the process will only take a few minutes.

What Is A PC Case Fan?

What Is A PC Case Fan?

A PC case fan is a device that helps cool down your computer by circulating air through the case. It is important to have good airflow in the CPU of the computer case to keep components from overheating.

Case fans come in different sizes and shapes, but most are either 80mm or 120mm. There are also different types of fans, such as LED fans, which have lights built into them.

Choosing the right PC case fan is important for keeping your computer cool and running smoothly. Make sure to get a fan that is the correct size for your case and has good airflow. Also, consider getting an LED fan to add some style to your setup.

How To Install A PC Case Fan?

If your computer is overheating, or if you want to prevent it from doing so in the future, one solution is to install a PC case fan. Here are simple instructions on how to do so:

1. Purchase a New PC Case Fan

Purchase a New PC Case Fan

When you are installing a PC case fan you have to keep in mind the size and shape of the PC fan.

  • The first reason is that the larger fan will move more air and therefore keep your computer cooler.
  • The second reason is that the larger fan will be less likely to fail than the smaller ones.
  • The third reason is that the larger fan will last longer than the smaller ones.

2. Unplug the Switch

After purchasing a new pc case fan you need to unplug the electric wire switch.

3. Remove the PC Side Panels

To remove the PC side panels, follow these steps:

Remove the PC Side Panels
  1. Remove the screws that secure the panel to the chassis.
  2. Gently pull the panel away from the chassis until it comes free.
  3. Repeat steps 1 and 2 for the other side panel.

Now that you have removed the PC side panels, you can install pc case fan(s).

4. Locate the power connectors

Locate the power connectors

In order to install a pc case fan, you will need to locate the power connectors on the motherboard of your PC.

The power connectors are usually located near the edge of the motherboard.

If you cannot find the power connectors, consult your PC’s manual or look for online tutorials that show you where they are located on the particular model of your best motherboard for the i9 9900k processor.

5. Contact the fan to the motherboard

Contact the fan to the motherboard

To install a PC case fan, you will need to contact the fan to the PC motherboard of your PC. This can be done by either using a screw or by clipping the fan onto the motherboard.

If you are using a screw to attach the fan, make sure that the screw is tight enough so that the fan does not come loose. You also want to make sure that the screw is not too tight, as this can damage the motherboard.

When clipping the fan onto your motherboard for i7 9700k, make sure that the clip is secure and that there is no gap between the clip and the motherboard. If there is a gap, then air will not be able to flow through properly and your computer will overheat.

6. Close up PC Case

The last step is to close up your PC Case.

Buying Guides: 5 Things to Consider Before Buying the PC Case Fan

When it comes to choosing a PC case fan there are a few things you need to take into account. In this buying guide, we will go over 5 important factors that you need to consider before making your purchase.

1. Size

As technology advances, the size of PC components continues to shrink. This is especially true for case fans, which are now available in a variety of sizes to fit any application.

When selecting a case fan, size is one of the most important considerations. The fan must be large enough to move the required amount of air, but not so large that it causes airflow problems.

There are many factors to consider when choosing the right size case fan for your needs. But with a little bit of research, you can find the perfect fan for your PC building.

2. Material

When it comes to PC case fans for the best computer monitors, there are a few different materials that you can choose from. The most common material is plastic, but there are also metal and even glass options available. Each material has its own benefits and drawbacks, so it’s important to choose the one that’s right for you.

Plastic is the most common material used for PC case fans. It’s lightweight and inexpensive, making it a great option for budget-conscious shoppers. However, plastic is not as durable as other materials and can be more prone to noise.

Metal case fans are more expensive than plastic ones, but they offer better durability and performance. They’re also typically quieter than plastic fans, making them a good choice for those who want a quiet PC.

3. Price

Looking for the best Open air PC case fan doesn’t have to be expensive. In fact, there are plenty of great options out there that won’t break the bank.

You don’t need to spend a lot of money to get a good quality PC case fan. In fact, there are plenty of great options out there that won’t break the bank. Here are our top picks for the best PC case fans you can buy on a budget.

In short, If you’re looking for a good quality PC case fan but don’t want to spend a lot of money, there are plenty of great options out there.

4. Color

When you’re looking for a PC case fan that makes a statement, then you’ll want to check out the selection of color options available. From bright and bold to more subdued and classic, there’s a shade to suit every taste. And it’s not just about looks either color can also have an impact on performance. 

For instance, lighter shades are better at reflecting heat, helping to keep your components cool. So whether you’re after something that looks good or works well, consider adding a splash of color to your next PC case fan upgrade.

5. Noise

PC case fans are a necessary evil when it comes to keeping your computer cool. But they can also be a major source of noise, especially if you have more than one fan in your case. There are a few things you can do to reduce the noise from your PC case fans. 

One way to reduce fan noise is to use quieter fans. There are many different brands and models of fans available, and some are definitely quieter than others. Do some research to find the quietest fans that will still provide adequate cooling for your needs. 

Another way to reduce fan noise is to use fan speed controllers. These devices allow you to manually control the speed of your fans, so you can run them at a lower speed and still get good cooling performance.

Frequently Asked Questions (FAQs)

Can you remove fans from a PC case?

Yes, you can remove fans from a PC case. However, doing so may result in overheating and damage to your computer. It is best to consult a professional before removing any fans from your PC case.

When it comes to managing the internal components of your computer, cable management, and exhaust fan placement are key. Knowing how to remove a fan from your PC case is an important part of ensuring that everything runs smoothly.

So, can you remove fans from a PC case? In short, yes! Many modern PCs offer easy access to all their internal components, making it relatively simple to remove fans.

Do PC fans need to be replaced?

The question of whether PC fans need to be replaced is one that many computer owners ask themselves. After all, good cooling fans are essential for maintaining the longevity and optimal performance of a PC.

Without quality fans circulating cool air, components can overheat and eventually malfunction or wear out faster than normal. But how often should these components be replaced?

When it comes to replacing PC cooling fans, there isn’t a single answer as each situation is unique. For example, if you use your gaming computer frequently and it’s exposed to a lot of dust then chances are the fan will need replacement more often than one not used as much or in an area with less dust.

Additionally, if your fan becomes noisy due to wear-and-tear then it may be best to replace it before any problems arise from lack of airflow.

How often should I Replace Case Fans?

When it comes to keeping your PC cool and running smoothly, understanding how often you should replace case fans is key. Case fans help keep the temperature of a computer’s internal components in check by expelling hot air out of the back or front panel of the computer. With regular use, these fans can wear out over time and require replacement.

The most important factor determining when to replace your case fan is its age; an aging fan can become noisy, cause reduced airflow, and stop working altogether.

Additionally, if you find that the fan cable or molex connector has become frayed or damaged in any way then it may also be time for a replacement.

Most standard PC case fans last anywhere from five to eight years before needing replaced but this lifespan can be shortened depending on usage and environment conditions such as dust accumulation.

How do I connect my PC case fans?

When it comes to controlling the fan speeds on your personal computer, it can be a daunting task. But with just a few simple steps, you can easily connect and control the fan speeds of your PC case fans. Here’s what you need to know about connecting your PC case fans and running them at full speed.

The first step is to connect each fan directly to the motherboard or Fan Control Hub (FCH). This will allow you to control the fan speeds via BIOS or a software application such as ASUS’ Fan Xpert 4.

When using an FCH, make sure that your power supply is capable of supplying enough power for all of the connected fans. Once this is done, you’ll be able to adjust each fan’s speed individually or set them all to run at full speed for maximum cooling performance.

Conclusion

In conclusion, following these steps will ensure that your PC case fan is installed correctly and will help to improve the overall performance of your computer. Regular cleaning and maintenance of your fan will also help to extend its lifespan. If you have any questions or concerns about the installation process, be sure to consult a professional.

Relevant Buyer Guides And Tips

  • Best PC Cases Under $70 Review [A List Of TOP 10]
  • Most Expensive Gaming Mouse 2023 Review [A List of the Top 15]
  • 21 Best Computer Vacuum Cleaner Reviews [For Keyboard And Electronics]

Filed Under: Blog, Guides, Tech

Which Is The Best Mouse In Pakistan? [A Guide]

January 3, 2023 by admin

Which Is The Best Mouse In Pakistan?

In Pakistan, there are many different types of mice to choose from. So, which is the best mouse in Pakistan? There are many factors to consider when choosing a mouse, such as price, performance, and features.

Mice are an important part of computers. You are interested in finding “Which Is Best Mouse in Pakistan?”

Based on these factors, we have discussed the 3 types of the best mice in Pakistan.

You will discover many brands and models of mice available, but you are not sure which one to buy.

We Suggest the Logitech Pebble M350 Modern gaming mouse because of its features, price and consumer reports!

3 Best Computer Mouse In Pakistan [DEALS]

Technology has come a long way since the early days of the personal computer. Mice, in particular, have seen a lot of innovation and different designs to suit different users.

3 Different Types of computer mice

Here is a run-down of some of the different types of mice on the market today:

1. Wireless computer mice

Wireless computer mice have become increasingly popular in recent years, as they offer a more convenient and comfortable way to use your computer.

There are a few things to consider when choosing the best wireless laptop mouse, such as battery life, size, and buttons.

Size is another important factor to consider. If you have large hands, you’ll want a larger mouse to avoid feeling cramped while using it.

Conversely, if you have small hands or prefer a more compact design, plenty of smaller wireless mice are available.

2. Wired computer mice

There are many factors to consider when purchasing a wired best gaming mouse. Price, features, and brand are some of the most important factors.

When it comes to wired mice, there are three main types: optical, laser, and mechanical.

Optical mice use an LED to track movement, while laser mice use a laser to track movement. Mechanical mice use physical buttons to track movement.

Optical and laser mice are generally more accurate than mechanical mice but can be more expensive. Mechanical mice are less expensive but can be less precise.

While some people might like wireless mice because they don’t have to constantly replace batteries, others like them in part because of their reduced maintenance.

Others prefer wireless mice because they’re more convenient and portable.

Ultimately, it’s up to the individual to decide which type of mouse is best for them.

3. Ergonomic computer mice

While there are a variety of ergonomic mice on the market, they all share certain features that allow them to be more comfortable for extended use than traditional models.

These include adjustable palm rests, contoured shapes, and thumb buttons that reduce the need to grip the mouse tightly.

Some ergonomic mice are designed specifically for right-handed users, while others can be used by both left- and right-handed people.

Ambidextrous models typically have symmetrical buttons and scroll wheels that can be accessed from either side.

If you spend a lot of time at your computer, an ergonomic mouse can help reduce fatigue and prevent pain in the wrist, hand, and arm.

However, finding a model that fits your hand size and grip style is important for the best results.

What to consider before buying a computer mouse In Pakistan?

You should keep a few things in mind before purchasing a computer mouse.

What To Consider Before Buying A Computer Mouse

1. Type of Activities 

Consider the type of activities you will use the mouse for most frequently. If you plan on doing a lot of gaming, you will need the best gaming mouse with high precision and sensitivity.

If you just need a basic mouse for everyday tasks like browsing the internet or working on documents, then you won’t need to spend as much on a top-of-the-line model.

2. Size of The Mouse

Another important factor to consider is the size of the mouse. Some people prefer smaller mice because they are easier to carry around, while others find larger mice more comfortable to use.

There is no right or wrong answer here; it simply depends on your personal preference.

3. Colour and design of the mouse

Most people don’t think about their mouse’s design when shopping for one.

However, the colour and design of the mouse can be quite important.

If you buy the best laptop mouse for your home office, you might want to consider a more professional-looking one in a dark colour.

On the other hand, if you are buying a mouse for your child’s computer, you might want to choose a brighter colour or even a character design.

There are also wireless mice available in a variety of colours and designs.

4. Price

The important factor to consider when choosing a mouse is the price. Mice may vary in price from a few dollars to hundreds of dollars. Read about the 15 most expensive gaming mice if you need them or if the budget doesn’t matter to you. It’s vital to identify a mouse that suits your budget and requirements.

There are many different types of mice on the market, so it is important to do your research before making a purchase.

5. Warranty And Return policy of the mouse

When choosing a mouse, there are many factors to consider. One important factor is the warranty and returns policy of the number one gaming mouse.

Some companies offer a limited warranty on their mice, while others offer a full refund if you are unsatisfied with the product.

It is important to read the warranty and return policy before purchasing. The best way to find the perfect mouse for you is to read reviews online.

Which Is the Best Mouse In Pakistan In 2023?

There are a few factors to consider when purchasing a mouse; what you’ll be using it for, your budget, and personal preferences.

Which Is the Best Mouse In Pakistan?

We’ve covered you with our top three picks if you’re looking for the best mouse in Pakistan.

For budget-conscious shoppers, the Logitech Pebble M350 Modern is a great option. It’s comfortable to use and has a two-year battery life, making it a great choice for casual users.

The Razer DeathAdder Elite is our top pick if you need a mouse that can keep up with your gaming habits.

It’s extremely precise and has customizable buttons, making it ideal for first-person shooters and other fast-paced games.

Why Logitech Pebble M350 Modern is the best choice?

There are many reasons to love the Logitech Pebble M350 Modern mouse.

Why Logitech Pebble M350 Modern is the best choice?
  • It’s sleek and modern, perfect for anyone who wants their desk to look chic and put together.
  • But this mouse is also super functional and comfortable beyond its good looks.
  • The button placement is ergonomic and easy to reach, and the scroll wheel is smooth and responsive.
  • Plus, the wireless connection is strong and reliable, so you’ll never have to worry about your mouse losing power or skipping around on your screen.
  • Overall, the Logitech Pebble M350 Modern is the perfect choice for anyone who wants a stylish and functional mouse that will make using their computer a breeze.

Conclusion

In conclusion, the best mouse in Pakistan is the Logitech Pebble M350 Modern. It is a great all-around mouse that provides good value for its price. It has a comfortable design, is easy to use, and has a variety of buttons that make it easy to customize for any user.

Relevant Guides And Tips

  • How To Install A PC Case Fan? [Quick-Start]
  • Do PC Cases Come With Fans?
  • 21 Best Computer Vacuum Cleaner Reviews [For Keyboard And Electronics]
  • 15 Best Office Chairs Under 500$ To Buy [Reviews & Buying Guide]

Filed Under: Blog, Guides, Tech

Best PC Cases Under $70 Review [A List Of TOP 10]

January 1, 2023 by admin

best pc cases under 70 review

When building any PC, the PC case is the essential thing you need to consider. You need a PC case that enables you to easily place all the components that you want to place in it. Also, it should offer you enough flexibility to add more components in the future. The good news is you can get the best PC cases under 70 dollars that offer you all these features. 

If you have never purchased a PC case, this guide is for you.

In this article, we will share with you all you need to know about buying the best PC case, along with some top-rated PC cases you can go for.

What is the cheapest PC case?

Almost all the PC cases reviewed in this article are affordable and available for under $70. Still, if you are looking for the cheapest PC cases, you should check out the Cooler Master products we reviewed in this article. These PC cases are relatively cheaper than other PC cases in this review. 

Hippo Adviser Savings For Pc Cases

Buying Guide: 5 Facts About PC Cases That You Don’t Know

When buying the best affordable PC case, there are many options out there that you can check out. Although we have talked about the Best PC cases under $70 in this article, if you want to explore more options, then there are certain things that you need to know. 

Here are the most critical factors that you need to consider when buying a PC case

1. Case Design

The case design is one of the most important things that you need to consider because it is going to have a direct impact on the performance and usability of the PC case. The PC case should be big enough to fit all the components you want to add.

This goes without saying that the PC case design should be good to look at. When you find a PC case that looks cool and allows you to fit all components in it, you can buy that PC case.

2. Airflow & Cooling System

Proper airflow is essential when it comes to building a PC. If you are buying a PC for high-end gaming and you are going to be placing a lot of powerful hardware components in it, the PC case should have some mechanism for proper airflow.

Also, the PC build you are getting should have the slots for the installation of the cooling system that you want. You don’t want to miss out on it because your PC will get hot when you use it. A cooling system is a must if you don’t want the performance of your PC case get affected.   

3. Cable Management

If you want a newer and cleaner PC build, you should get a PC case that offers efficient cable management features.

A sound cable management system is essential in terms of the looks of the PC, and it will also help you make changes quickly in the future. There should be separate sections in the PC case for placing cables. So, look for a PC case with good cable management features to enhance your PC building experience.

4. Additional Features

Other optional features would be great if your PC has RGB lighting, glass panels, classy front-panel connectivity, support for an extra fan, etc. It would be much better if the PC case allowed you to adjust the RGB fan and the lighting.

Some PC cases offer LED effects on the control buttons, which look fabulous. You can look for all these features in the PC case you buy to build your PC. Again, most of these features are optional. They don’t have a significant impact on the performance of the PC case.

5. Your Budget

The choice of a PC case depends on your budget. You can get cheap or expensive PC cases based on your budget.

If you want the best-looking PC cases under $70, you should check out the products we have reviewed in this article. You’ll find a massive range of the best and most affordable PC cases under $70 in this review that you can go for. 

Buying a quality PC case requires you to consider a lot of things. From the design to the airflow and cooling system, there is a lot that you need to keep in mind if you want to buy the best PC case for $70 or less.

In this detailed guide, we will introduce you to some of the best and most affordable PC cases you can find out there. All the products we will review here in this article are top-rated, and they have positive user feedback from gamers from all around the globe.

10 Under $70 PC Cases [Nov 2023 Updated]

Here are the 10 Best budget PC Cases Under $70 that you can buy to build a classic gaming rig for yourself.

1. Best Overall: NZXTH510 Compact Tower PC Gaming Case

NZXT H510 is a compact ATX Mid-Tower PC gaming case. It comes with Front I/O and a USB Type-C port. It has a tempered glass side panel that makes all the internal components visible to you.

This PC offers you excellent cable management features. It is Water-Cooling ready, and you can choose from multiple color schemes per your preference. This PC case supports Mini ITX, Micro ATX, and ATX motherboards. This PC case is quite durable and will last for a long time.

nzxth510 compact tower pc gaming case [best pc case under $70]

You can use the Water or the Air-Cooling systems with this PC case. It offers support for both. The design of this PC case is quite neat and modern. The cable management system of this PC case makes it stand out from all the other options on the market.

The intuitive design of this PC case allows you to create a PC build in a much shorter amount of time compared to all the other options on the market.

2. Under Budget: Cooler Master MasterBox NR400

MasterBox NR400 by Cooler Master is a Tower case for Micro-ATX motherboards. The case comes with Front Mesh Ventilation which keeps the PC cool during intense use.

Pc case under 70 [Cooler Master MasterBox NR400]

The design of this PC case is relatively minimal. A tempered glass side panel also creates a cool look for this PC. You get a single headset jack with the PC case, which adds to this product’s pros. The thermal performance of this case is quite exceptional. The ventilated top panel doesn’t let the PC get heated.

This PC case supports graphics cards up to 346mm. The clearance space is a lot, and it can easily handle the latest graphics cards. You can get this PC case with or without the ODD. For cable management, this PC case offers rubber grommets paired with a 22mm clearance behind the motherboard, which offers a lot of room for easy cable management.

3. Best For Fast Work: AeroCool Cylon RGB Computer Case

AeroCool Cylon is an affordable PC case that features RGB lighting. It is a Mid-Tower computer case that comes with an acrylic side window. The case has black, and it looks fantastic on it. This computer case features an elegant backslash LED with 13 lighting modes on the front panel.

aerocool cylon rgb computer case under 70 dollars

The AeroCool Cylon is known for its excellent cooling features. You can use a liquid cooling system with it. It also supports air cooling. You can choose the cooling system that works best for you.

It supports the VGA fan bracket design. You can add 2 120mm fans to it for an excellent cooling performance. It also offers you support for SD and Micro SD card, which is hard to find in a computer case in this price range.

Its dual-chamber design offers improved ventilation. It comes with a PSU filter which is easily removable and can be cleaned relatively easily. The best part about this PC case is that it supports many motherboards with different form factors. You can place Micro ATX, Mini ATX, and Mini ITX motherboards on it.  

4. Budget Friendly: Phanteks Eclipse P400A Compact Tower Case

Phanteks Eclipse P400A is an ATX Mid-Tower PC case with a mesh front panel. The case also features a tempered glass panel, and it includes a fan controller that you can use to adjust the speed of the fans as per your requirement.

This case comes in black, which looks great on it. The design of the PC case allows it to deliver optimal cooling performance. The interior of the case is quite spacious. It can support up to an E-ATX motherboard and a 280/360mm radiator on the front.

phanteks eclipse p400a compact tower case under 100

Phanteks Eclipse P400A includes 2 preinstalled fans that perform at high speed. Using the Fans Controller, you can choose between low, medium, or high speeds. The best thing about this PC case is the unique storage capabilities that it has to offer. You can install 6 HDDs and 8SSDs on it.

It features 2 USB 3.0, a mic, headphones, and power button I/O interfaces. All in all, this case is quite robust and will offer you long-lasting performance.

5. Best Alternative: Fractal Design Focus G Mid Tower Computer Case

Fractal Design Focus G is a Mid-Tower PC case designed to enclose ATX form factor motherboards. This case offers a high airflow and comes with 2 Silent II Series 120mm fans with white LED. This motherboard supports the air-cooling method. It has a contemporary design and can accommodate high-performance components with excellent efficiency.

corsair carbide 200r pc case review

If you want high airflow and you prefer a modern design for your PC case, then we suggest that you check out the Fractal Design Focus G case. Focus G comes with a filtered front, base, and top air intakes, which don’t let the dust sit in the case.

You can add premium quality CPU coolers to it, offering multiple radiator configurations. You can add a graphics card up to 380mm in this case. All in all, this best-budget PC case is quite suitable for gamers. It has a premium build, and the design looks sleek and fabulous.

6. Good Choice: Corsair Carbide 200R PC Case

Corsair gaming gear is well-known in the gaming community because of its excellent quality and performance. The Corsair Carbide is no exception.

The Corsair Carbide 200R Mid-TowerATX motherboard PC case is a high-performance case with support for USB 3.0. This PC case allows you to do tool-free SSD and HDD installation. The cable routing offered by this PC case is simply phenomenal.

corsair carbide 200r pc case review

It comes with CPU cooler backplate motherboard cutouts. There are seven PCIe slots for you to work with. It can also take in GPUs that are up to 320m long. This case offers mounting capabilities for up to 8 fans. This means you could set up a powerful cooling system for your PC.

Along with all of that, you also get dust filters for the front of the case and the PSU intake. You can install 120mm, 140mm, and 240mm radiators. If you are looking for the best-looking PC cases under $70, then we highly recommend this case for you.

7. Best For Office: Lian Li Mid-Tower Chassis ATX Computer Case

The Lian Li Mid-Tower Chassis is for ATX motherboards and is an excellent choice for building a gaming PC. It comes with a tempered glass side panel which looks fantastic.

lian li midtower chassis atx computer case review

This PC case offers you many different variants you can choose from. All these variants have slightly different price ranges, and you can choose the one that offers features per your requirements. You get magnetic dust filters with this PC case on the top and the front of the case. A dust filter tray at the bottom collects all the dust and doesn’t let it settle in the case.

You get removable SSD mounting brackets, allowing hassle-free and flexible storage installation. There is a dedicated bay for PSU and HDD, and the clearance is enough so that you’d be able to handle everything without any problems.

The air performance of this PC case is quite remarkable. It is roomy and durable. To create a class build for your PC, you should check out the Lian Li chassis.

8. Best For Gaming: Montech Fighter 500 Black ATX

Montech Fighter 500 is a top-of-line PC case when you talk about the best gaming PC cases under $70. This PC case is for Mid-Tower ATX builds and is suited for you if you plan on building a gaming PC.

montech fighter 500 black atx computer gaming case review

It comes with preinstalled rainbow LED fans, bringing out a great look for the case. Montech features the Mesh 3D front panel and a side panel with tempered glass. You get high airflow with this PC case, and the heat prevention mechanisms are significant.

In terms of color, you can choose the black or the white-colored variant, depending on your preference. Both have the same price range. This PC case is excellent for ATX, Micro ATX, and Mini ITX motherboards. The dimensions of this PC case are roomy enough to enclose the latest hardware components.

Montech has a unique design with M modeling architecture, making the most out of every part of the case. The dust resistance features of this case are phenomenal.  

9. Also Great: Zalman S5 RGB Medium Tower ATX

The Zalman S5 RGB Mid-Tower ATX case features a sleek and modern design with glass panels. It comes in black color that looks great. This product is an excellent blend of tempered glass and alloy steel materials, which offer remarkable durability.

zalman s5 rgb medium tower atx case reviews

This PC case supports ATX, ATX Micro, and Mini ITX motherboards. Zalman S5 offers you a dynamic RGB lighting effect that looks incredible. If you want a stylish gaming case with an efficient cooling system, we recommend you check out the Zalman S5.

The design of this PC case promotes optimal airflow. It comes with a preinstalled 48mm RGB fan and a regular fan that quickly dissipates the heat inside the case.

The case has front and side RGB LED strips that create a dynamic playing atmosphere. This pace case is perfect for gamers in terms of design and performance. 

10. Best Choice: Cooler Master MasterBox Q500L

Cooler Master MasterBox Q500L is a Micro-ATX Tower that supports an ATX motherboard. You get magnetic dust filters with this PC case that prevent dust accumulation inside the case.

The transparent acrylic side panel looks remarkable and lets you see the components inside the PC case. The best thing about this PC case is it offers you flexible I/O options. The fully ventilated airflow of this PC case is one of a kind. There are 3 design variants with minor design changes that you can go for.

The chassis is fully perforated and offers optimal airflow. The moveable I/O panel is quite versatile. You can move the panel to 6 different locations in the case. This PC case supports vertical placement for the power supply unit. The case allows you to utilize all the internal space optimally.

With all the features that it has to offer, MasterBox Q500L is one of the best PC cases that you can find at an affordable price.

Under $70 Pc Cases FAQs

Who makes the best quality computer cases?

When it comes to choosing the best quality computer cases, there are many factors to consider. Many people focus on aesthetics, while others emphasize cooling capabilities and noise levels. But one of the most important aspects is quality – ensuring that your case has top-notch construction and durability.

To help you make an informed decision when selecting your next PC case, let’s take a look at some of the features that indicate superior quality.

For starters, if you’re looking for a case with excellent visibility into its interior components, then opt for one with a tempered glass side panel. This allows you to get an unobstructed view of all your internal components without sacrificing any protection from dust or debris.

Additionally, 140mm fans provide superior airflow compared to smaller ones and can help keep your system running cool even when under load

What is an excellent cheap ATX case?

A good ATX case doesn’t have to break the bank. When it comes to testing and comparing products, Fractal Design Define is an excellent cheap ATX case for anyone looking for a cost-effective solution. It features excellent ventilation and cooling options, as well as a wide variety of features that make it great value for money.

With its sleek design, versatile customization options and plenty of room inside, this is the perfect choice if you’re looking for something that won’t send your budget through the roof.

Phanteks Eclipse 400A and NZXT H510 are two of the best ATX cases that you can find out there. These cases are cheap and offer excellent airflow along with durable build quality.

What is the best PC case for 100 dollars?

Whether you’re looking for something small and sleek or something extra durable, there is an option out there that will fit within your price range. There are several different brands and styles of PC cases available at this price point, each with its own set of features and benefits.

Many offer great airflow options to keep your system cool, as well as ample storage space for cables and other components. Plus, some come with additional features like sound-dampening materials or RGB lighting capabilities to give your setup a stylish look.

If your budget is $100 or less, we recommend going for either the NZXT H510 or the Phanteks Eclipse 400A PC case. These cases are significant in terms of the quality and the performance that they have to offer.

Final Words

PC cases can be pretty expensive sometimes. Most new gamers shy away from experimenting with their PC builds. But it doesn’t have to be that way for you.

The PC cases we reviewed here in this article are all quite affordable. We picked the top product from brands like Cnet, PcMag, and Appuals. You can get any of these PC cases to start building your robust PC build. If you need help choosing the best case for your PC, feel free to contact us. We’d be happy to help you out!

Relevant Guide And Reviews

  • Most Expensive Gaming Mouse [A List of the Top 15]
  • Is Gaming Monitor Good For Office Work? [A Complete Guide]

Filed Under: Blog, Electronics & Computers, Tech

  • Go to page 1
  • Go to page 2
  • Go to page 3
  • Go to Next Page »

Copyright © 2025 · Aspire Pro on Genesis Framework · WordPress · Log in